Section 14: Checking and Revising Documents
⏳ Training Duration: 1 Hour
🎯 Level: Intermediate
🧠 Method: Theory and Practice
📦 Material Format: Interactive (offline/online)
📌 Requirements: Have created and structured a document in Word
🎯 Objective: Participants can perform spelling checks and provide revisions using Word features.
Microsoft Word provides various features to make the process of checking and revising documents easier, both manually and automatically. However, before checking spelling or making revisions, we need to make sure that the document's structure and formatting are also in good condition.
🧹 Checking a Messy Document
A document that looks simple does not necessarily have a well-organized structure. Sometimes we may find excessive spacing between words, paragraphs with unexpected spacing, text that shifts because of Tab, or too many Enter key presses.
Problems like these often occur when we type a document manually, combine content from multiple sources, or copy and paste from websites and other documents. These problems may not always be obvious at first glance. However, when the document is edited, additional text is inserted, or content is moved to another page, inconsistent formatting can cause the document's appearance to change unexpectedly.
When we find unusual spacing or text positioning, it is better to first identify what is causing the problem. Microsoft Word provides a feature that allows us to display hidden formatting marks in the document, making it easier to understand the actual structure of the text.
🔎 Showing Formatting Marks
To see formatting marks that are normally hidden in a document, we can use the following shortcut:
⌨️ Ctrl + Shift + 8
After pressing the shortcut, Word will display various formatting marks, such as:
- ¶ → Pilcrow / Paragraph Mark, indicating the end of a paragraph.
- → → indicates the use of a Tab.
- · → indicates a Space character.
These marks will not appear when the document is printed. Their purpose is to help us see the hidden structure that determines how the document looks.
If the space between two paragraphs appears unusually large, we might assume that the Paragraph Spacing setting is causing the problem. However, after displaying the formatting marks, we may discover several ¶ symbols because the Enter key was pressed repeatedly. This allows us to fix the actual cause of the problem instead of simply changing formatting settings without knowing what is wrong.
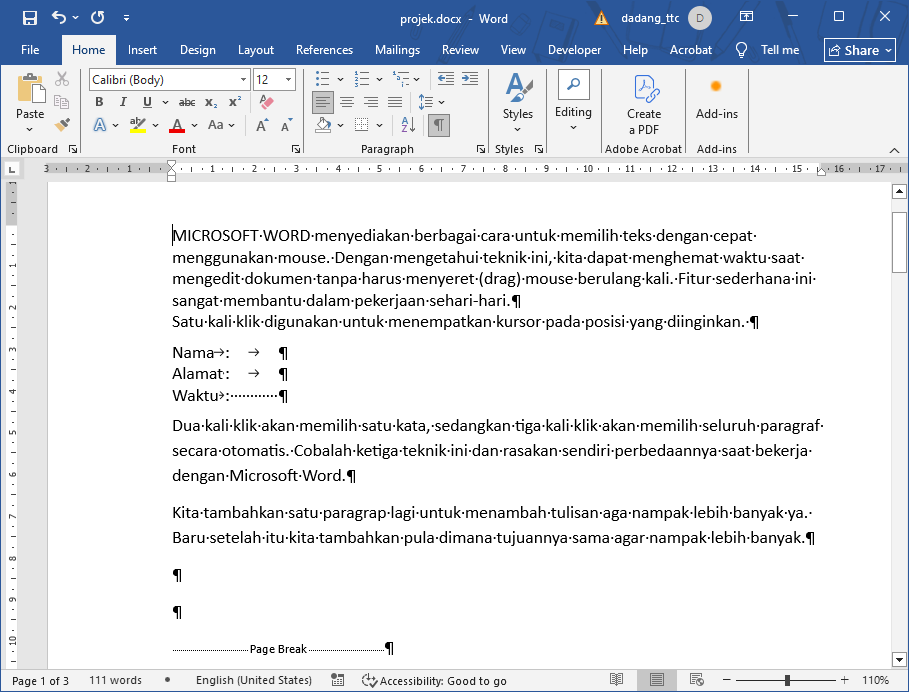
🎬 Watch the Demonstration
Have you ever seen the ¶ symbol in Microsoft Word but didn't know what it was called? This symbol is called a Pilcrow or Paragraph Mark.
In this short video, we demonstrate how to display formatting marks using the Ctrl + Shift + 8 shortcut. These marks help us understand the hidden structure of a document, including Paragraph Marks, Tabs, and Spaces.
💡 A quick tip to help us understand the hidden structure of a Microsoft Word document and identify the cause of unusual spacing or formatting.
Formatting marks are displayed only on the screen and will not appear when the document is printed. We can show or hide them again by pressing Ctrl + Shift + 8.
Many documents look neat but still contain spelling errors or uncontrolled revisions. With Word’s checking and revision features, we can ensure that documents are:
- More professional
- Free from typos
- Easy to review by a team
💡 Pro Tip: In addition to using automatic checking features, get used to adding footnotes, image captions, and consistent formatting using Styles. This makes documents look professional and easy to update without changing each element one by one.
In Section 6: Writing & Editing, we discussed how to remove red and blue lines that appear while typing.
In this section, we will learn how to use those features to perform automatic writing corrections.
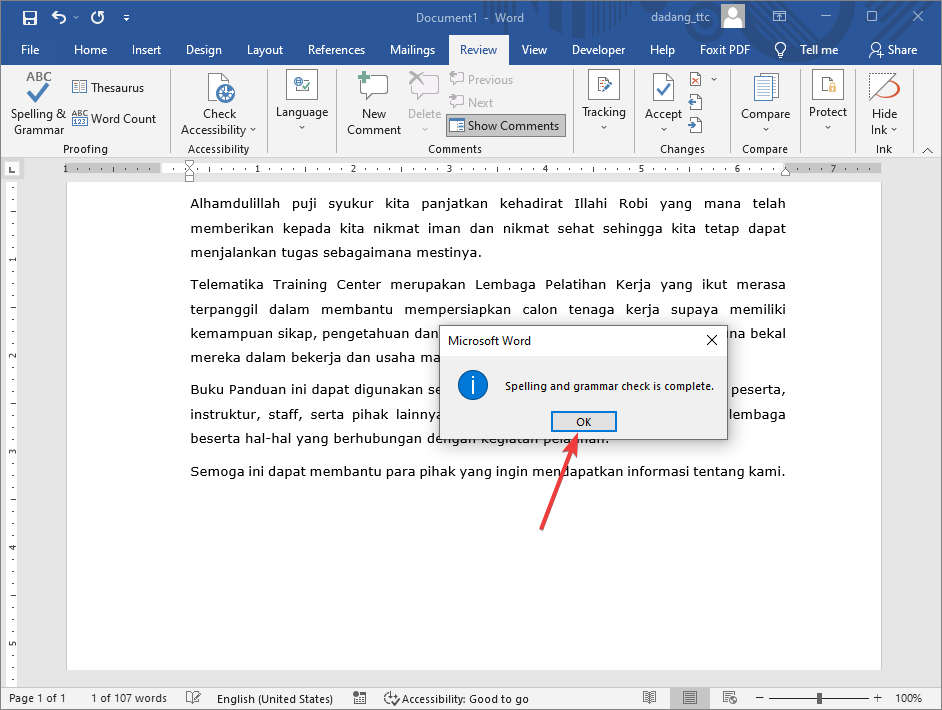
Spelling and Grammar Check
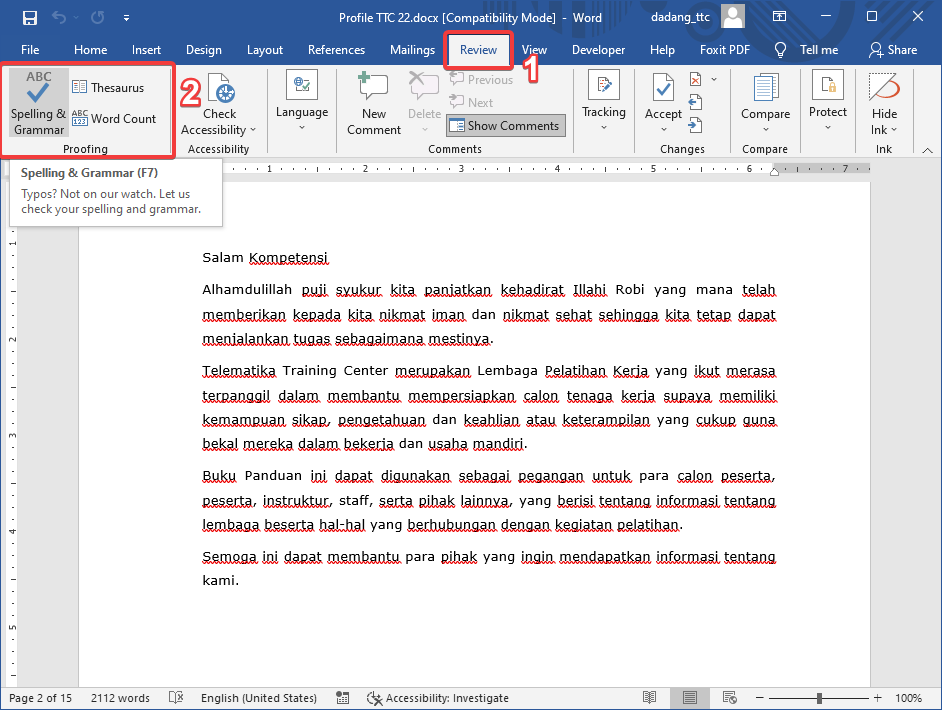
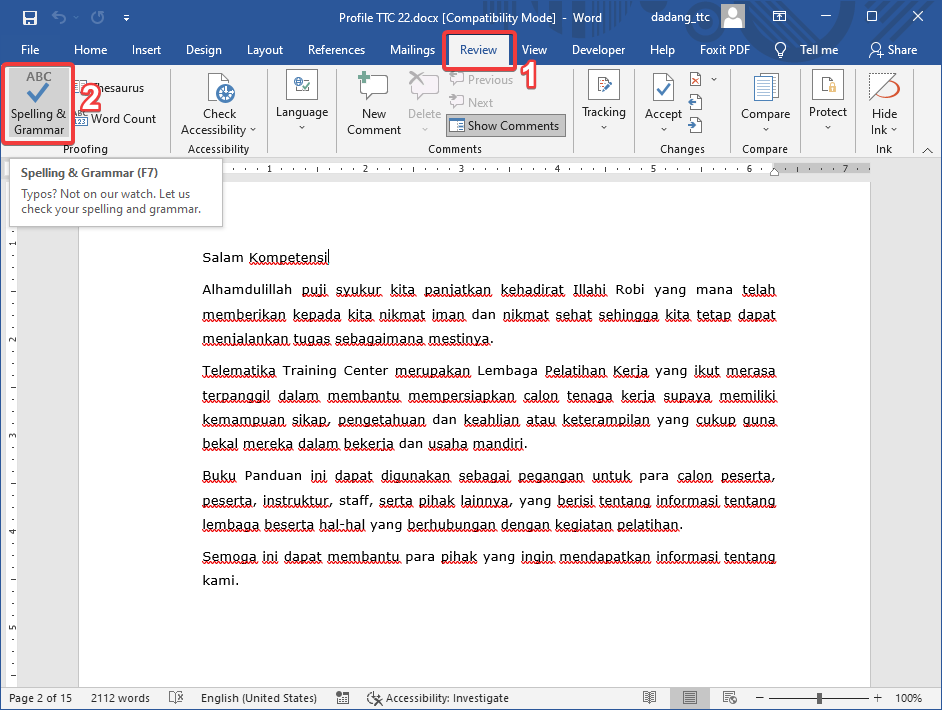
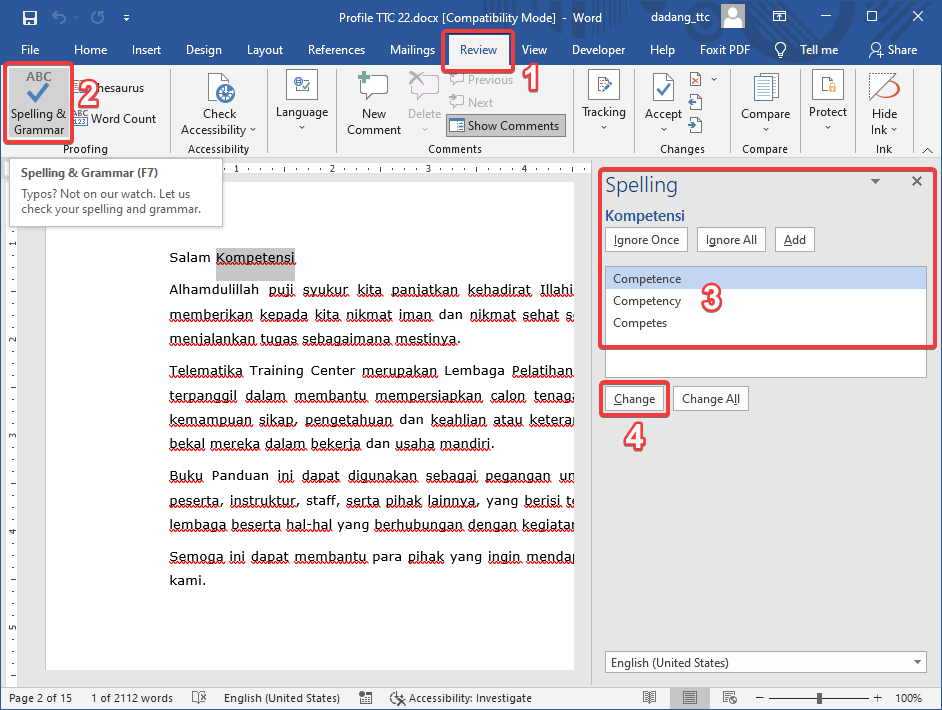
- Select the Review tab.
- Click Spelling & Grammar to start automatic checking.
- Correct the suggested words or ignore them if they are already correct.
The Spelling & Grammar feature works based on the selected language. If your document is in Indonesian, make sure the language setting is correct for more accurate results.
🌐 Using Indonesian Spelling
By default, Microsoft Word uses English for the Spelling & Grammar feature. Therefore, if you type in Indonesian, some words may be considered incorrect even though they are actually correct.
To make Word recognize Indonesian spelling more accurately, you need to change the language setting to Indonesian (Indonesia) with the following steps:
- Select the text or press Ctrl + A to select the entire document.
- Open the Review tab.
- Click Language → choose Set Proofing Language.
- Select Indonesian (Indonesia).
- Click OK.
After changing this setting, the Spelling feature will adjust to Indonesian.
💡 Pro Tip: For more accurate Indonesian results, combine Microsoft Word with additional tools such as Grammarly (for English) or perform manual proofreading to ensure proper sentence structure.
Track Changes and Comments Feature
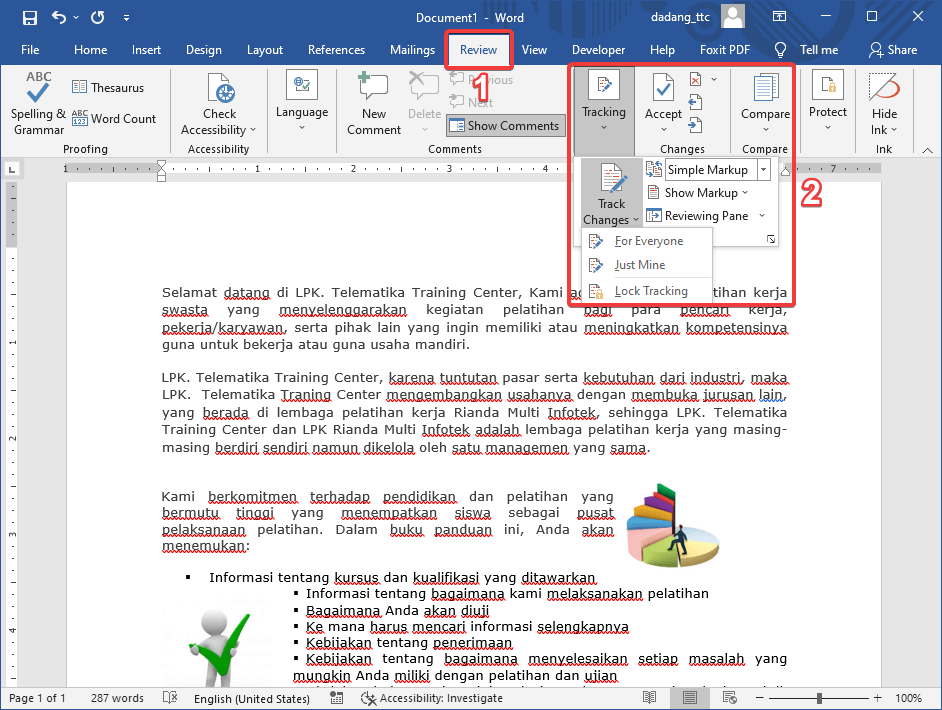
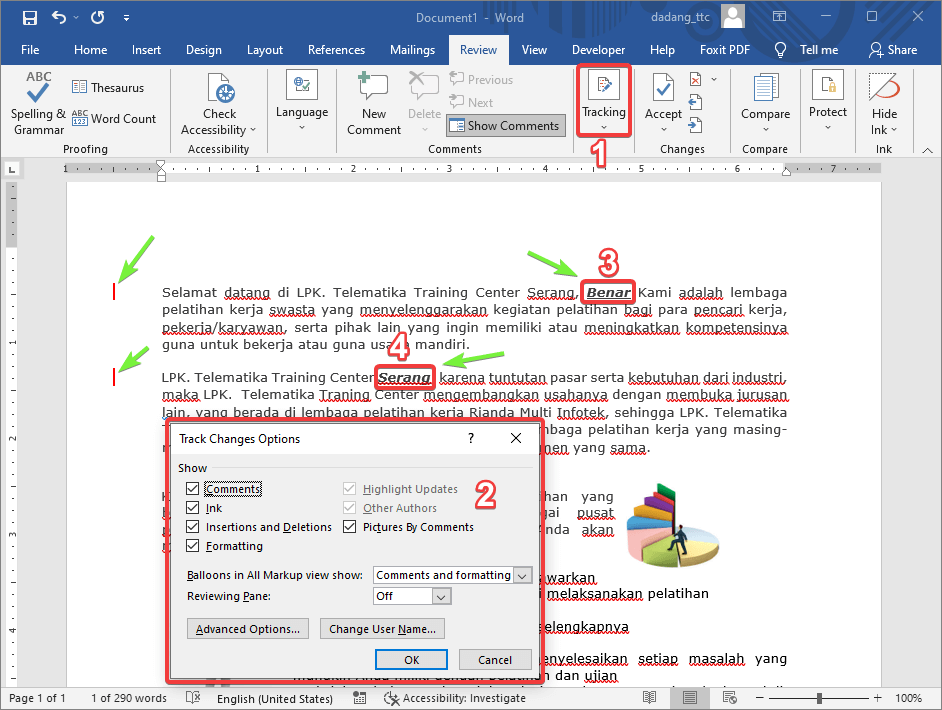
How to Enable Track Changes
- Click the Review tab
- Click the Track Changes button
- Start editing the document
- Every change will be automatically marked
- Enable Track Changes to record all revisions.
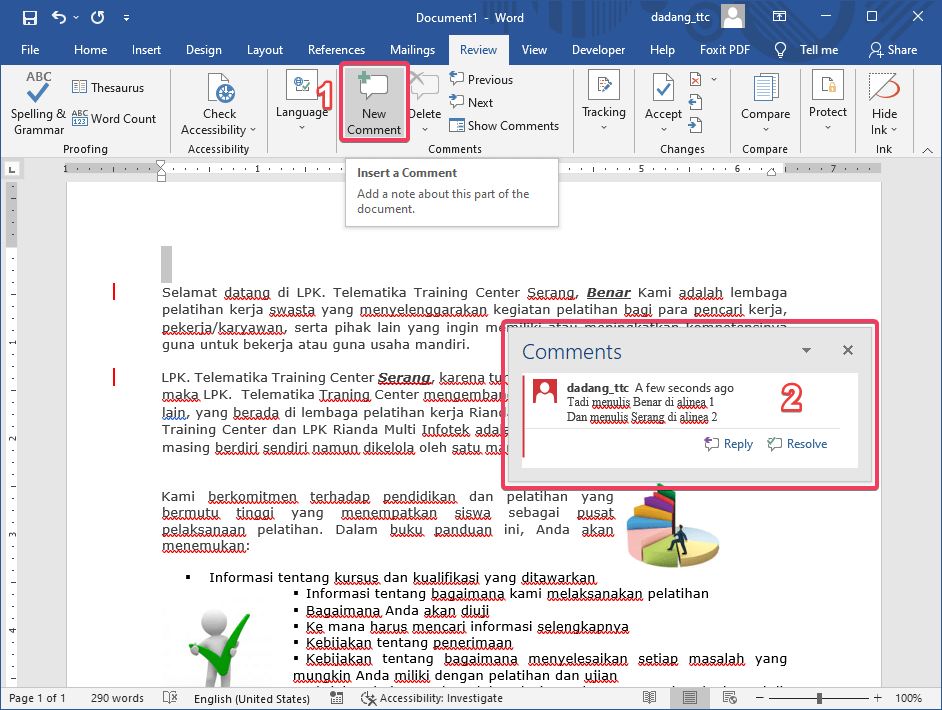
- Use New Comment to add notes or revision suggestions to specific parts.
- All changes can be reviewed and accepted/rejected one by one.
How to Add Comments
- Select the text you want to comment on
- Click the Review tab
- Select New Comment
- Type your note or suggestion
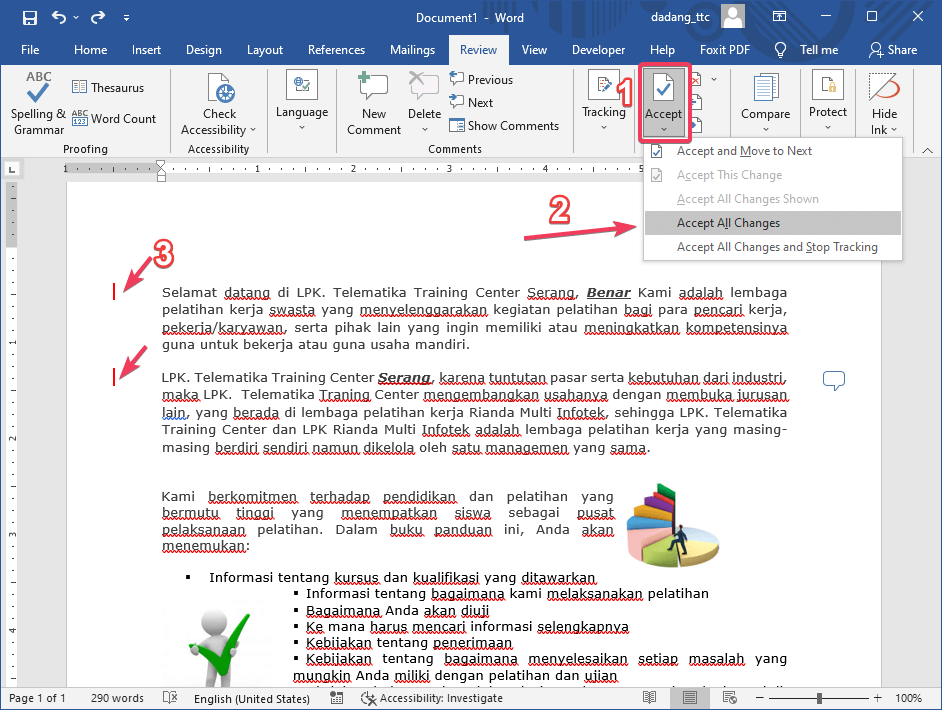
How to Accept or Reject Revisions
- Open the Review tab
- Click the change you want to review
- Select Accept to approve
- Or select Reject to reject
- Always enable Track Changes when revising team documents
- Use comments for discussion, not direct editing
- Do not send documents without spelling checks
- Use Accept All only after all revisions are reviewed
- Not enabling Track Changes during revisions
- Directly editing others' documents without comments
- Ignoring red/green lines from Word
- Clicking Accept All without reviewing changes
📌 Conclusion
The checking and revision features in Microsoft Word are very helpful in ensuring documents are neat, accurate, and professional.
- Spelling & Grammar helps detect spelling and grammar errors automatically.
- Track Changes records every change clearly, making it easy to review.
- Comments make it easy to provide notes or feedback without altering the main content.
By utilizing these three features, the revision process becomes more structured, collaborative, and efficient—especially when working in teams or preparing important documents such as reports and proposals.
💡 A good document is not only one that is written, but one that has been checked and refined.
📝 Practice:
- Open an existing document
- Enable Track Changes
- Edit several words in a paragraph
- Add a comment to one sentence
- Use Accept and Reject to review changes