Part 13: Using Styles and Document Navigation
Using Styles and the Navigation Pane in Microsoft Word is an essential technique for creating long documents such as reports, proposals, papers, and theses. By understanding how to apply Heading 1, Heading 2, and create an automatic table of contents, you can manage your document structure professionally and efficiently. This guide has been updated to match the latest commonly used versions of Microsoft Word.
⏳ Training Duration: 40 Minutes
🎯 Level: Intermediate
🧠 Method: Theory + Practice
📦 Format: Offline & Online
🎯 Objective: Participants will be able to use Styles for consistent formatting and navigate long documents efficiently.
Understanding Styles
📘 Styles are a text formatting system in Microsoft Word used to maintain consistency in documents, such as titles, subtitles, and paragraph content.
💡 The most important concept: Each Style (for example, Heading 1) has only one format applied throughout the entire document. This means if you use Heading 1 in multiple places, all of them will have the same appearance (font, size, color, and spacing).
🚀 Example: If you change the color of Heading 1 to blue, all text using Heading 1 will automatically turn blue—without editing one by one.
🎯 Why Styles are important:
- Maintain consistent formatting
- Speed up global editing
- Help structure documents (chapters & subchapters)
- Enable automatic features like Navigation Pane and Table of Contents
📌 Styles are commonly used for: Chapter Titles (Heading 1), Subsections (Heading 2), and Sub-subsections (Heading 3).
How to Use Styles (Headings)
Follow these steps:
- Select or highlight the text you want to make a title.
- Go to the Home tab.
- In the Styles section, choose:
- Heading 1 → main title (chapter)
- Heading 2 → subheading
- Heading 3 → sub-subsection
- Click the style, and it will be applied instantly.
How to Modify a Style
If you want to change the appearance of a heading (color, font, size), follow these steps:
- Right-click on Heading 1 in the Styles section.
- Select Modify.
- Adjust font, size, color, and spacing.
- Click OK.
🚀 All text using that heading will automatically update.

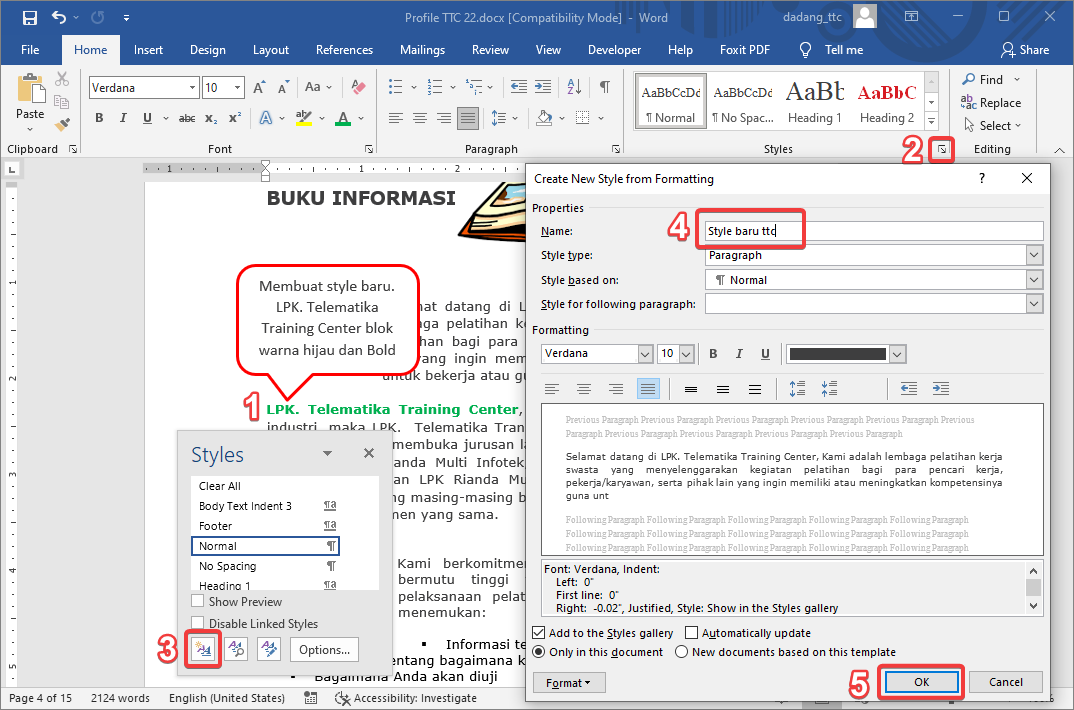
Creating Custom Styles
Sometimes default styles like Heading or Normal do not meet your needs. In this case, you can create your own custom style.
🎯 Example uses:
- Special styles for important notes
- Quote formatting
- Tips or highlight formatting
Steps to create a custom style:
- Format the text first (font, size, color, bold, etc).
- Select the text.
- On the Home tab, in the Styles section, click the small arrow (bottom right).
- Click New Style or choose Save Selection as a New Quick Style.
- Give it a name (e.g., Important Note).
- Click OK.
🚀 Your new style will now appear in the Styles list and can be used anytime.
Custom styles do not automatically appear in the Navigation Pane.
👉 Only styles with Heading (outline level) will appear in navigation and the table of contents.
If you want custom styles to appear, you must set their outline level as a Heading.
💡 Pro Tips:
- Right-click the style in the Styles list
- Select Modify
- All text using that style will update automatically
👉 This is very useful for maintaining consistent document design without manual editing.
🔽 Move to Navigation Pane
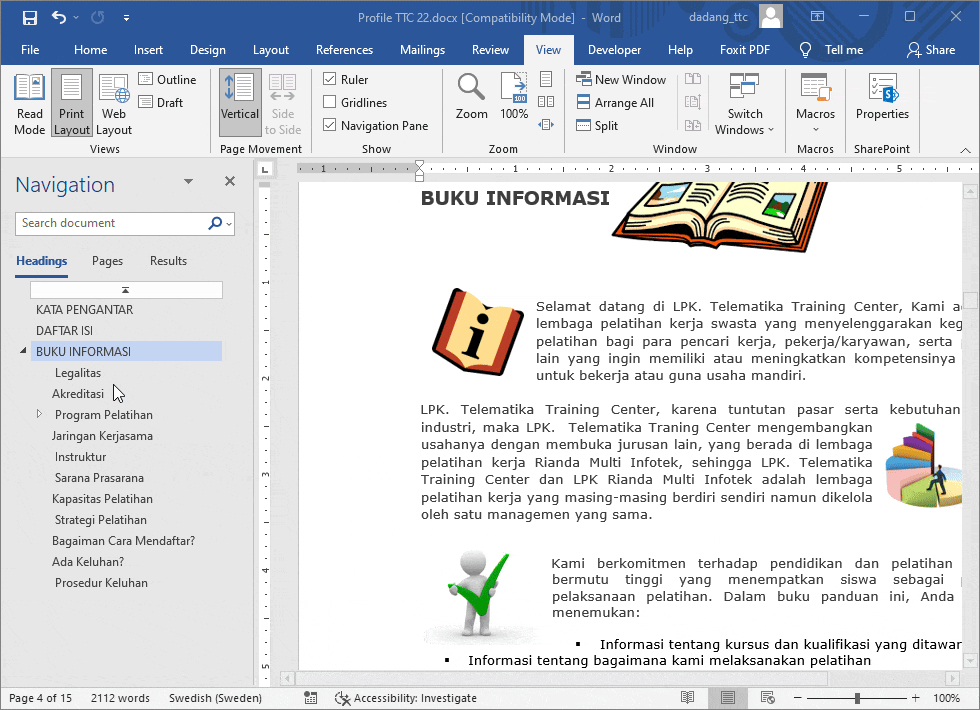
Using the Navigation Pane
📂 Navigation Pane is a feature in Microsoft Word that displays your document structure based on headings (Styles).
💡 Meaning: The Navigation Pane is the result of proper Style usage.
- View overall document structure
- Jump between chapters with one click
- Reorganize content using drag & drop
How to Enable Navigation Pane
- Click the View tab.
- Check Navigation Pane.
- The panel appears on the left side.
Only text using Heading styles will appear.
❌ Styles like Normal, Title, Subtitle, Quote will not appear.
💡 If text is missing, it likely doesn’t use a Heading.
How to Use Navigation Pane
- Click a heading to jump to that section.
- Use drag & drop to rearrange sections.
- Use search to find specific text.
🚀 This allows you to manage long documents quickly without scrolling manually.
Common Mistakes
- Manual formatting (bold + large font)
- Not using Headings
- Inconsistent formatting
- Navigation Pane does not work
- Table of Contents cannot be automated
- Documents become difficult to manage
✅ Solution: Always use Styles, not manual formatting.

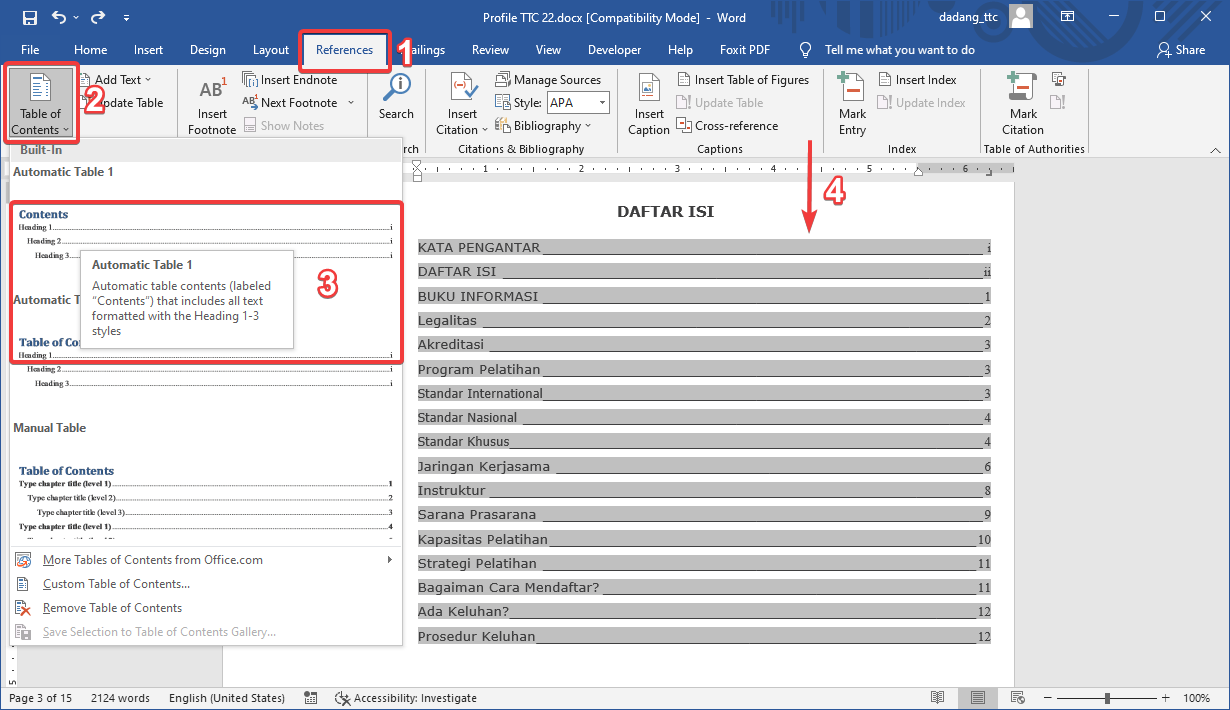
Automatic Table of Contents
Using Styles allows you to create an automatic Table of Contents via References > Table of Contents.

Other Benefits of Styles
- Consistent formatting
- Faster editing
- Better navigation
- Clear structure
- Easy reorganization
- Professional standard
- Integration with features
- Better collaboration
Styles are not just about appearance, but about professional document management.
📝 Practice:
- Use Heading 1 for chapters, Heading 2 for subchapters.
- Open Navigation Pane and navigate between sections.
- Insert an automatic table of contents at the beginning.
📑 Want Your Word Document to Look More Professional?
Headers and footers work best when your document structure is well organized. Learn how to create an automatic table of contents using headings and page breaks.
🚀 Hands-On Lab: Automatic Table of Contents in Word