Hands-On Lab: Use Excel Form for Faster Data Entry
⏳ Training Time: 30–45 Minutes
🎯 Level: Beginner – Intermediate
🧠 Method: Hands-on practice
📦 Material Format: Interactive, can be used offline
📌 Requirement: Able to create a table in Excel
🎯 Goal: Participants can use the Form feature in Excel to enter data more quickly and neatly.
The Form feature in Excel is very useful for entering data quickly and neatly, especially when working with tables that have many columns. With a form-like interface, you can add row-by-row data without having to scroll left and right.
🔍 Functions and Benefits of the Form Feature
- Makes data entry easier, one entry per view
- Helps avoid incorrect column placement
- More comfortable than typing directly into cells
- Supports navigation buttons (New, Delete, Find Prev, Find Next, Restore)
🧭 Steps to Create Table and Display Form
- Prepare Excel data with the first row as column headers (e.g., Name, Address, Age).
- Select the entire data range, then press Ctrl + T to create an Excel Table.
- Ensure the table name appears, such as
Table1. - Add the Form button to the Quick Access Toolbar (see tip below).
- Click the Form button → A form window will appear for data entry.
🏆 Advantages of Using Form
- Faster data entry with fewer misclicks
- Ideal for data with many columns
- Each data entry appears like a form, improving focus
- Can be used to search data using navigation buttons
- Allows adding or deleting rows directly
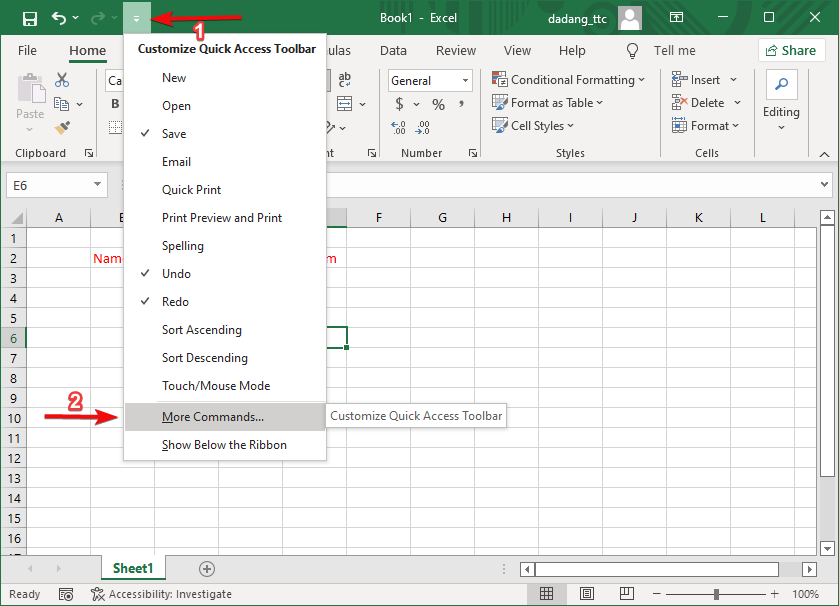
💡 Tip: Add Form Button to Toolbar
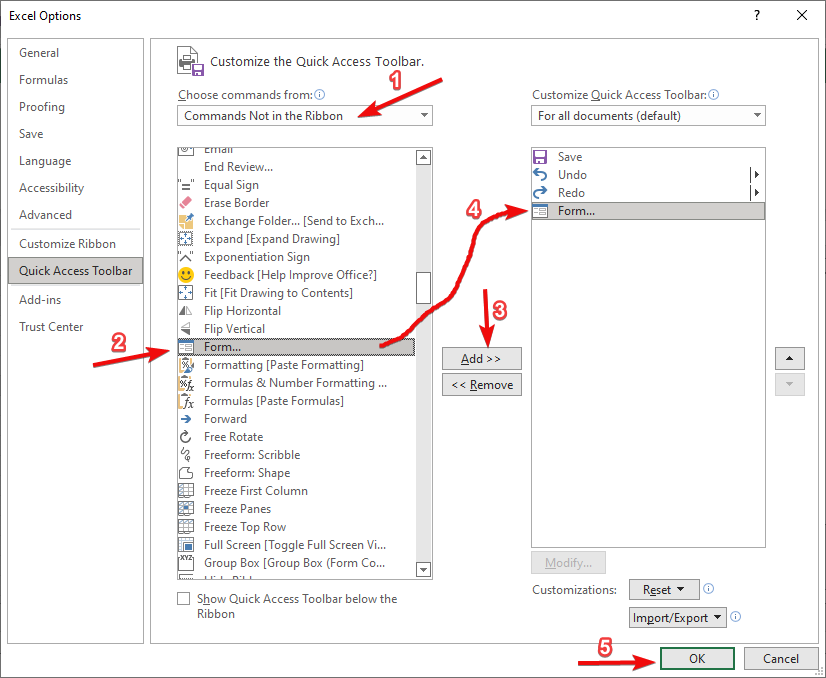
- Right-click the Quick Access Toolbar (above the Excel ribbon), then choose Customize Quick Access Toolbar.
- Under Choose commands from, select Commands Not in the Ribbon.
- Scroll and select Form..., then click the Add » button.
- Click OK. The Form icon will now appear at the top of Excel, ready to use.
🧪 Case Study: Enter Training Participant Data
We'll create a form to enter training participant data including: Name, Phone Number, Address, and Program.
- Create headers in the first row:
Name | Phone | Address | Program. - Select all these columns and convert them to a table (Ctrl + T).
- Click the Form button in the toolbar, then start entering data one by one.

Good luck! This feature is great for teachers, school admins, small business owners, and office staff who regularly work with lots of data entries.
Note: The Form feature only works with data formatted as a table (not a normal range).
After understanding the concept, steps, and use case of the Form feature in Excel, it’s time to see the actual practice through the video below. This video demonstrates the complete workflow, from creating a table to using the Form for data entry so the process becomes faster, cleaner, and more comfortable to use.
🎥 Video Tutorial: How to Create a Form in Excel for Data Entry
📥 Sample Excel File (Creating a Form)
Use this file to practice creating and using the Form feature in Microsoft Excel, starting from preparing the data table to entering data in a more organized, faster, and error-minimized way—without typing directly into worksheet cells.
⬇️ Download Excel Demo FileWant to Learn Excel and Computers for Free?
Visit the full guide and join free classes from TTC: